Monday, March 19, 2012

Cocoon Strippings


A few pictures of some ‘paper’ I made from Cocoon Strippings related to the theme of disintegration and the rabbits skeleton which I found and drew from recently. I intend to work on this theme over the next months.


This sort of fabric paper, in case you have not come across it, is made by placing cocoon strippings on a piece of net or similar, spraying with water, covering with another piece of net and then gently ironing. The strippings contain natural serecin gum and this enables them to stick together. Last year I made an artists’ book using quite a lot of this ‘fabric’ and included pine needles, and fragments of writing. It is quite easy to add bits and pieces as you layer it up.


This sample is not really successful but I was also trying out edges and ideas for using my new Embellisher. I had to have one and you know I deserve it!


The holes were made by burning with an incense stick and using a punch. As you see it is also possible to draw onto the ‘fabric’.
Don't forget Stitched's March blog hop,details in the previous posts.

Tuesday, March 13, 2012

Material Girls


For any of you in the area you may like to visit the above exhibition; come  to the opening morning on Saturday 24th and enjoy a piece of cake as well.


Don't forget this months blog hop tutorials celebrating 'Stitched'.


March 1st: Deborah  http://deborahsjournal.blogspot.com/
March 5th: Paula   http://www.paulajoerling.com/

March 8th: Mollie     http://wildolive.blogspot.com/

March 13th:  Cindy Caraway     http://artfullivingonthebluff.blogspot.com/

March 15th: Jennifer   http://sewhooked.com/

March 20th: Kelli    
http://ephemeralalchemy.blogspot.com/2012/03/paper-button-tutorial.html 


March 22nd: Tracie   http://www.radicalrecycks.com/
March 27th: Alma        http://www.almastoller.blogspot.com

March 29th: Ann Tucker    http://thelavendartree.blogspot.com/

Wednesday, March 07, 2012

'Stitched' Blog Hop Tut. Part 2


Now to make the fold book, decide on the pieces of printed fabric which you prefer. A useful tool is a card window made by cutting out two pieces of card at right angles.


These can be used to frame the areas of any design work to decide the area with which you would like to work.
Cut out the pieces of fabric about three by two and half inches. Use pinking shears for a decorative edge or fray the edges by removing a few threads on each side. Choose some white and some black pieces.
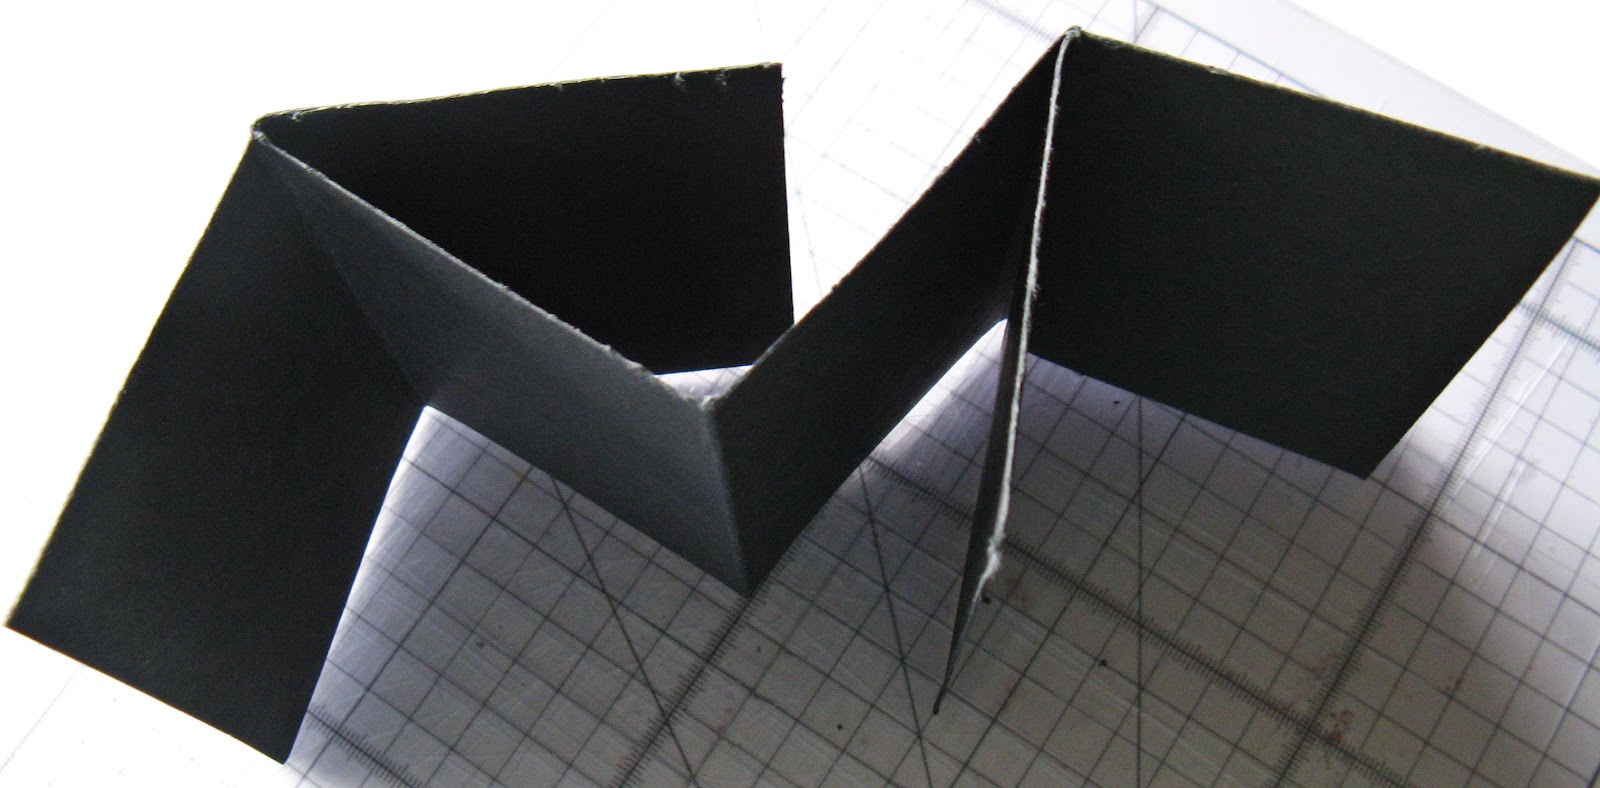
Here are instructions on how to cut and fold the card. Perhaps try it out on scrap paper first.
Fold 1.


Fold 2


Fold 3 & 4


Spread the card with its folds out in front of you and make a T shaped cut as shown outlined in white. A sharp blade and a safety ruler are ideal. If you use a blade gently stroke the line to be cut rather than trying cut in one stroke.


Your card should now nicely concertina into a folded book.


 Now add the fabric pieces working on both the back and front pages of the book. Fix with foam dots or glue. Use a white pen to give the front cover a title of your choice.
Decide how you want to fasten the book. You could use ribbon. A nice idea is to measure a piece of the printed fabric about eight and a half inches long by four times the finished width. Fold the edges in and stitch. Add a fastener, a small popper or similar.


Tuesday, March 06, 2012

Blog Hop Tut..


In this tutorial you will print fabric with ‘found objects’ and use your ‘prints’ to decorate a simple fold book.


Requirements
Small pieces of both black and white fabric.
Found objects.
Black and white acrylic paint.
Sponge pieces.
A padded surface, such as a plastic bag over newspaper; or wrap a towel round a piece of board and cover this with a sturdy plastic bag.
Masking tape.
An A4 piece of black card.
Scissors.
Foam dots or glue.
A white gel pen.
Ribbon or a small popper for the book fastener.


Look around for lids, cotton reels, pieces of foam or card, combs, nails etc. to print your patterns. Beware, you will never want to throw this type of ‘stuff’ away again.  All sorts of packaging material will become addictive and begin to hold wondrous possibilities. In short you will soon run out of space.


For printing you need to tape your piece of fabric to a padded
surface. You will dab the paint onto the object, being careful not to use too heavy an application of paint. You may want to dab onto a piece of tissue before you print. Keep practising until you get a feel for the right amount of paint.


Old cotton reels make some of my favourite shapes and are often quite intricate.
Print one shape inside another. Overlap shapes. Use a piece of card to make crosses etc. Build up patterns.
Corks are useful. Print with them as they are or carefully cut out a simple shape at one end.


If you have some old embossed cards, I don’t suggest you use your credit card, but perhaps an old membership card of some kind, you can print with them to add letters and numbers. They will of course be in reverse. Using scissors you can cut shapes out of the plastic to add more interest.


So enjoy yourselves and I will be back later to show you how to 
 make a fold book and decorate it.


Tuesday, February 28, 2012

Blog Hop Tutorials


To celebrate the extension of Stitched to January 2013 Alma Stoller has organized a blog hop which will start in March. There will be two free tutorials a week, in fact mine, which starts on 6th March, will be in two parts.
We hope you will enjoy them and have fun; there should be plenty of variety.


March 5th: Paula   http://www.paulajoerling.com/

March 8th: Mollie     http://wildolive.blogspot.com/

March 13th:  Cindy Caraway     http://artfullivingonthebluff.blogspot.com/

March 15th: Jennifer   http://sewhooked.com/


March 22nd: Tracie   http://www.radicalrecycks.com/
March 27th: Alma        http://www.almastoller.blogspot.com

March 29th: Ann Tucker    http://thelavendartree.blogspot.com/


Click here to visit Alma Stoller.

Wednesday, February 22, 2012

Burning and piercing.


Last Saturday was the final day of the Transform, Change, and Disintegrate workshop with Louise Baldwin. It was a very interesting course following a theme with ones’ own imagery and techniques, which produced a wide variety of work. It is so helpful to have a tutor to help you sort out what’s good and what’s not working, I like a tutor who is prepared to both encourage and tell you what needs to be worked on.


 My ‘sample’ with the waxed and holed paper had improved but was suffering from me trying to frame the edges and so this was easily rectified in a course which is about disintegrating, with a bit of careful ripping. I added the line which was so clear on the close up of the rabbit’s scull.


These are some of the papers, including receipts, which I burned, pierced and then waxed.
My new favourite tools is a Japanese Hole Punch which I have been looking at with envy for some time. I decided that life was too short to go without and bought myself one. A wise decision.
I also had both a basic go and a demonstration from Louise as to how I could progress if only I had an embellisher; so watch this space.


Friday, February 17, 2012

Tacket Binding


Yesterday I was lucky enough to attend an Embroiderer’s Guild day workshop on Tacket Binding. The tutor was  HEATHER HUNTER        whose work ‘Washed Up’, with a whirlwind binding, was the inspiration for the format of my book made for the final exhibition during my Diploma course. As I don’t get to the regular meetings due to work commitments it was a treat to attend the workshop. I must admit it was something of a distraction as I am trying to be more focused on my theme this year, but sometimes you just have to eat all the chocolates at once.


My binding is unfinished but well on its way. If you get the chance to attend a workshop with Heather I would recommend her patience and experience as a tutor. This is one of her examples:


Tacket Binding is a very old form of binding in which documents were bound into paper or vellum covers in a way which meant that the papers could be taken out and replaced by new documents. The tackets act as a sort of staple.


Saturday, February 11, 2012

'Transform,Change,Disintegrate'.


I am enjoying my workshop with Louise Baldwin at City Lit. in London; it is over three Saturdays but with a one week break for half term, which is nice as it gives one time to think things through a little. 
The theme is Transform, Change, and Disintegrate. In the first session we were shown pictures of work by artists who work with this theme, starting with a time lapsed film made by Sam Taylor-Wood. There was also a good list of artists whose work we could research, of course the internet now makes this so much easier. I particularly liked this aspect of the workshop because when you are out of the loop it’s good to be reminded of all the inspiring work which is around.


We then picked a few words to illustrate in samples. I worked with ‘peeling’ and slashed, and tore various papers before waxing them.


 Louise suggested that I look at the work of Antoni Tapies. I had never seen his work but this week he has been in the news having just died.


I then burned and waxed various papers to play around with. The resulting sample was not really successful, but the resulting photographs are interesting. There was also a lot of wire brushing of fabrics.


Tuesday, February 07, 2012

Peeling

Peeling by stitchworks-jackie
Peeling, a photo by stitchworks-jackie on Flickr.

Paper, paint and wax.

Sunday, February 05, 2012

Just messing.


Just messing about with this drawing from my bones and fancying doing some stitching, I decided to colour one of the monoprints using Ink Tense crayons.


I can’t say it was altogether successful, but fun to do and interesting to see what resulted.


Here is a link which my son gave me to an artist who does amazing paintings, you can see his fascinating process here.

Friday, January 27, 2012

Monoprint


I have had some fun with monoprinting some of the images from my rabbit bones.


If you follow the blog you probably know that I am a fan of monoprinting which can be done in a number of different ways and with varied media In fact my workshop on ‘Stitched’                            (Click here to visit Alma Stoller.) is   based  on monoprint and stitch.
                                                                   
A couple of weeks ago DMTV showed a slightly new version to me and I have been trying that out on some hand dyed fabric.
The results vary depending on how much paint is used. I think I may prefer the slightly squashy look to the
clearer line. I used acrylic with a medium rather than fabric paint as used on DMTV..


You will note that so far I am sticking with colour. I start my course tomorrow so I do plan to be more monochrome.


Related Posts Plugin for WordPress, Blogger...