Wednesday, June 25, 2008

Guess What.

I’ve been doing some felting .Just to see if I could remember how and also to use the wool which I gathered in Ireland when we were there this time last year.
I didn’t expect it to felt well so I used it for detail on top of white merino and needle felted some detail with black merino. There is also a bit of Leicester on the surface.

It’s quite hairy but I think that gives it character, but not to be used with a smart black suit!

Monday, June 16, 2008

Wax collage

Once again playing around with wax collage; this started with thinking of ideas of how to use the metal from coke cans. It has bits of crisp packet, metal, dress making pattern, lace and wool sandwiched between layers of wax. It is quite easy to stitch into and the holes can be sealed by ironing the wax.I've made it into a little book ,about 12cms high,using handmade paper. You may notice that I have spent a bit of time tidying the blog, and have put on some labels and a new profile. I’m also trying to get round other peoples’ blogs now that I have more free time


Tuesday, June 03, 2008

Wax Collage

I’ve never really liked encaustic art, but at the same time I’m fascinated by the use of wax on paper and fabric. Looking round the internet I came across images of wax collage and that, combined with finding a minute travel iron in a charity shop, meant that I had to have a go. Isn’t it funny how when you have an idea in the back of your mind you sometimes just come across exactly what you need without even looking; it was sold as a travel iron but I think it is really a craft iron which was never used.


Scraps of dress making tissue, old maps, drawings, thread and lace are sandwiched between layers of beeswax and then the wax is ironed smooth. On top I added some Peal Ex pigments.


The base was a piece of Indian Rag paper; you need something substantial, perhaps watercolour paper. It is quite easy to score and bend after waxing.
The surface is really tactile.

Friday, May 30, 2008

Treasury

I'm having a lucky month having been chosen for another Etsy Treasury.
http://www.etsy.com/treasury_list_west.php?room_id=11524

Have a look at the lovely vibrant colours chosen by debralinker, an acrylic artist living in Seattle.

Saturday, May 24, 2008

Urban Art

http://www.digitalartsonline.co.uk/news/index.cfm?NewsID=10468

DBO (we are related) has an exhibition in London in June - read all
about it here. Proud parents, the're such a pain!!

Friday, May 23, 2008

Print Paste


Cornstarch Paste (courtesy of Collage Source Book. Karen McCarthy)

Dissolve 1 cup into 1 cup of room temperature water.
Heat slowly.
Gradually add 3 cups more water, stir over heat until boils.
Stir 2/3 minutes until it is thick and forms a gel.
Let it cool completely.
Remove 1 cup and place in blender.
Add 1 cup of water and blend until smooth. This makes a thin paste.
Adjust the quantities proportionally as required. Add less water
for a thinner paste.
Strain.
Add paint or pigment.
Will keep in the fridge, but be aware that after a while it will
start to smell!
On thicker paper, such as rag paper or watercolour paper, use
Combs, end of paint brush etc. to make marks.
You can add shading with fabric paint, pencils etc..

Sunday, May 18, 2008

'Bagsket'


http://foofanagle.wordpress.com/2007/06/26/bagsket-tutorial/
Here is a link to the tutorial for this bagsket. I enjoyed making this
as something of a distraction after the end of my course. It has been
such a hectic time since last September that it feels odd now to have
no clear purpose for all my creative urges. I think it’s just a
matter of going with it until life settles into a more usual routine
once again.
As requested, I will post a recipe for the print paste soon.


I think I used a thicker fabric than in the original, which resulted in the base being quite difficult to attach. The instructions are really clear but beware it takes a lot of time and concentration. The separate lining has a row of small pockets which should make it nice and useful.

Monday, May 12, 2008

Paste paper.


Just for fun I made this little accordion fold book for someone who has just moved house. I remember making paste paper when I was at school but only recently found a ‘recipe’ for it in the ‘Collage Source Book’ by Karen McCarthy.
It is called cornstarch paste in the book, which is an Americanism for what we call Corn flour in the UK. I coloured the paste with acrylic paint and after combing it on both Indian Rag Paper and some paper I had made, added more colour with fabric paint.
In the book the paper was used to make paper quilts. As you see, I stitched into it on the machine; it would be interesting to try hand stitching. If anyone would like the recipe let me know and I will post it here.

Monday, April 28, 2008

Tribal Messages

My book is finished now and I am busy trying to complete all the assessment paperwork. This week we set up the studio for the end of year exhibition and next week will have the stage three assessment, before the exhibition opens with the private view on 12th May between 6-8pm..
The paperwork is mind-boggling and I sometimes think is it worth it, but I suppose it is about wanting to finish the course properly at this point. Some people will be going on to do degrees and I do envy them but I know it’s not for me at this point in my life.
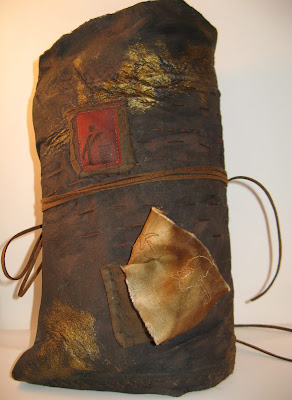
Someone called the book a' modern relic’ and that was the idea I was trying to convey, so that if an archaeologist in the future found it he would be faced with trying to work out what our society was like from some of the signs and symbols which are about everywhere , even if we rarely notice them. On the front are supposed to be talismans, which in Africa used to contain writings thought to have magical powers, in mine I have put signs for 'corrosive','biohazard' ,'keep dry' and 'don't litter'.
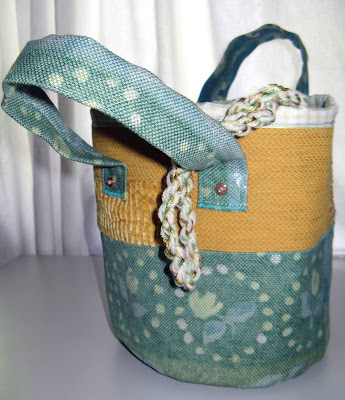
Tuesday, April 22, 2008

Etsy

http://www.etsy.com/treasury_list.php?room_id=40412


This is a link to an Etsy treasury that I am in .

Many thanks to Liz Plummer of Dreaming Spirals:
http://lizplummer.com/blog/

I have not done much with my shop recently but will be updating it once the course is finished.

Tuesday, April 15, 2008

Tribal Messages

On a programme we have in the UK called University Challenge there was a question last night about signs and symbols and I got them all right being more aware of them at the moment; they included the sign for ‘compostable’ and the one for ‘antivivisection’. Do you know what they are? Here are two of the pages for my artists’ book.


This page is worked on a piece of cotton which I dyed with Potassium Permanganate and discharged with lemon juice. Over it I have stitched signs for ‘corrosive materials’ and ‘biohazard’. I have made some paper and also dyed the pulp in the same way, adding bits of bay leaf to give some texture.
This page is stitched onto handmade paper and is overlaid with a piece of organza on which I managed to print. I tried various ways of doing this and settled on spraying a piece of card with 505 spray and attaching the material. I printed out the messages in the same way.

Friday, April 04, 2008

Tribal Messages

I have decided to call my piece ,in the form of an artist’s book, Tribal Messages. It will juxtapose contemporary signs and symbols with traditional Adinkra symbols from Ghana.
I have been working on the cover which I wanted to look like an ancient relic, and with a bit of paint and use of the hot air gun a piece of chamois leather now gets somewhere near to the effect I wanted. I had the Deka paint as a free gift from Fibercrafts, I think not many people wanted muddy brown, but it came in very useful .It looks like Elephant skin to me.
The inside of the cover brings together various Adinkra and contemporary saying. I sprayed material with 505 spray and put it onto card which then went through the computer fairly easily. I used scrim and pieces of silk carrier rods dyed with tea to get the ethnic look I wanted.

Wednesday, March 26, 2008

Printing Workshop

Over Easter I did a four day workshop in printing; as usual it was exhausting but really interesting. Fortunately there were a range of different presses to use, and as I have a problem with my back the easey peasey electric one was made for me - just press a button and away you go. 
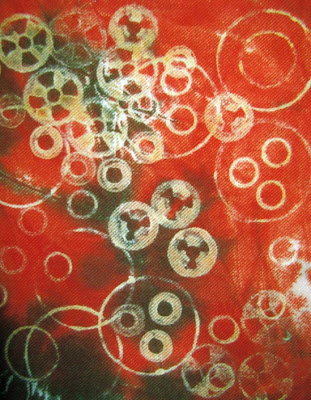
This really is the way to make monoprints, so much better than by hand. After the first impression you use a weight to hold down the paper and then you can move the masks, lace whatever to a new area. The oil based inks give a really clear colour. I also had a go at collograph and an etching using a leaf to make marks in the soft ground. The leaf was hard work as it took lots of patience to get it away from the ground and still leave enough to be etched away in the acid bath. I am going to use some of the prints in my book about signs and symbols and will show you those as I go along. See my current header for one of the prints using an Adinkra symbol.

Monday, March 10, 2008

Adinkra symbols

For the final project I am going to be working with images from packaging. I started by scanning in lots of bits of packaging I had saved, one of which was an elaborate wrapper from a bar of Fair-trade chocolate. When I looked at it in detail I found that the symbols were called Adinkra and were traditional allegorical symbols used on the robes of chiefs in Ghana. I really had not noticed them on the wrapper but just thought it was a nice piece of paper. The symbols tended to be used on mourning robes and only by people of special standing. Now they are used on many types of festive occasions and also as logos on a variety of items. I have made some printing blocks from cord and also a couple of lino prints.
The bird symbol is called ‘return and get it’ and is the symbol of the importance of learning from the past.
The ‘Siamese Crocodile’ is about the animals sharing one stomach but still fighting over food. As I understand it the message is that infighting and tribalism is harmful to everyone.
My plan is to juxtapose these symbols which carry a thoughtful message with those which are on nearly every piece of packaging we throw away but are hardly ever noticed.

Tuesday, March 04, 2008

Skaters

I did a number of pieces for the assessment for Part 2 of my course. I had to decide on a final piece and this was the one the other students thought appropriate.

I enjoyed the process as I have never stitched figures before but I felt technique wise it was rather derivative, based on the work of artists whom I had researched. I took photos and then traced the figures on the computer. Printed out the shapes and used silk organza like tracing paper to copy the figures with erasable marker prior to free machining.


It’s much easier to machine back and side views, it gets really difficult when you get to faces. I suppose it calls for more practise. I like the technique of leaving the loose threads and layering the pieces. You can't really see the layers in the photos, but I played around with the effect of putting some figures at the back and getting a layered effect to give some depth.

Tuesday, February 12, 2008

Reconstructed book.

Reconstructed

In the library at University College for the Creative Arts there is a really interesting display of reconstructed books which have been made by the Foundation students. I think the difference from ‘altered’ books is this seems to be mainly about restructuring the book in some way, rather than decorating or painting. Some of you may know more about this than I do. We did a project where we took in an object which had some meaning to us and then were asked to take it apart and reconstruct it in a meaningful way. I took photos as I didn’t really want to cut up clothing or furniture. Back to the books; I really liked the tactile look of them and had to have a go. I bought my paperback from a charity shop, but it was still a bit hard to start folding the pages. This is my first effort, with some thread and wax added.

Tuesday, February 05, 2008

Circles


One of the ideas I had for the Space project was to work on the idea of a circle, a shape ‘which separates the space it surrounds from the space surrounding it’. I took some photos of round objects and played around with printing from bottle caps and lids for a while but that’s as far as I got. I can recommend Koh-I-Nor water based dyes which are brilliant colours and work well on paper when discharged with bleach. I have also sprinkled salt in places. In the UK I got a small palette of them from Art Van Go.


I used discharge paste to try to replicate the result on procion dyed fabric.


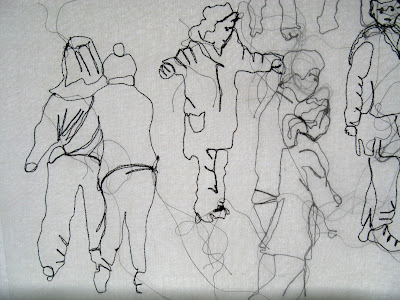
I have also been playing around with the settings on my camera which I have not used before; Sepia, Vivid Colours and trying to get less depth of field. As you can see this is a cotton reel which I used in my printing and discharging experiments.


Saturday, January 26, 2008

Animation

Last Sunday, quite by chance, I saw an exhibition of ‘Out of the Ordinary’ craft work at the Victoria and Albert Museum in London. Anne Wilson, an American artist, had some amazing pieces made from bits and pieces of lace and crochet. The main piece, set out on a white table, was called Topology and was a kind of black and white landscape made out of black lace and pins. You had to get down to eye level to take in all the fascinating detail.
By coincidence she also showed a series of videos of bits of thread and pins with some co-ordinated music which made it really funny; the coincidence was that we have been learning how to make the most basic animation at college. So I went home and had a go with bits of wool- so here is my basic attempt. Unfortunately I can't get it to loop here so you will need to keep pressing the play button.
I recommend you visit Anne Wilson’s web site to see her great animations and inspiring work.

Tuesday, January 15, 2008

Space 2008

Amongst other things, i.e. learning how to use a SLR camera and a life drawing class, I have continued with the pieces related to the theme of personal space. I will spare you my life drawings out of respect for the models, and because they were really best kept to myself. It was daunting as it is the first time I have done life drawing but a good experience and I would certainly like to have the opportunity to improve. We were all at different stages, and of course some people’s work was excellent - which is good as you can see what to aim for.
I have worked on the shadow images by stencilling onto silk noile and then onto silk organza; I have also machined the outlines onto organza. I have then been playing about with the layering effect. Nothing is stitched down as yet, and I can imagine the pieces hanging freely, so that you really get the effect of the layers and transparency
The piece about personal space and the ‘aura’ between people began to look more successful as I went over the seeding with markal oil stick, and put in some thicker threads. Still work in progress.
Related Posts Plugin for WordPress, Blogger...